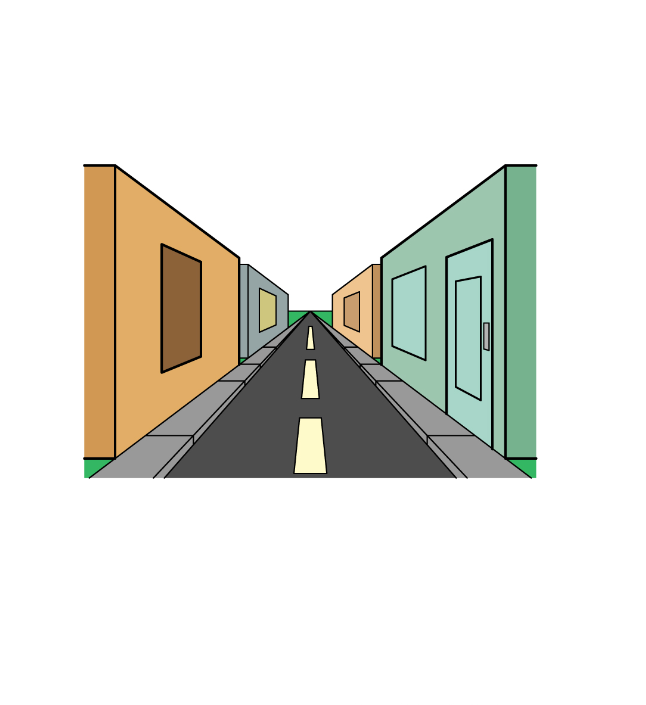
While drawing, there are many deceive one can use to make the deception of 3D viewpoint on a level page. These procedures stunt the cerebrum into seeing a viewpoint that doesn’t exist and can be somewhat precarious to pull off. These stunts utilize a one-point viewpoint. This includes having a picture with a solitary evaporating point, which is normal for pictures like streets and horizons. Figuring out how to draw a one-point viewpoint will assist you with causing many fascinating situations and scenes and is an extraordinary device to have in your drawing munitions stockpile. Toward the finish of this instructional exercise, you’ll have a universal knowledge of repeating this stunt.
Stage 1:
All through this aid on the most proficient method to draw one point viewpoint, you’ll require a ruler helpful, or you’ll be battling with the entire aide. In light of that, we can begin with the aide when you have your ruler and most loved drawing apparatus. For this initial step, we will define a few boundaries; significantly, they should all begin from a solitary point. Attract a speck to the focal point of the page, then, at that point, define four boundaries outward. Give a valiant effort to situate them as indistinguishable from our reference picture, as could be expected, as this will act as the road and walkway for the picture.
Stage2:
You attracted the essential diagram of the road in the past piece of your one-point viewpoint drawing, and in this next part, we’ll add more detail to it. First, you can begin by defining flat boundaries at the edge segments of the walkway. You can likewise define boundaries along within edges of the walkways, as these will give the substantial pieces some level. Then, we’ll attract three square shapes, the focal point of the road. Each will get continuously more modest as they go up, and these will additionally assist with showing the point of view of the image. wolf drawing easy
Stage 3:
The road is presently finished, so for the following stages in this aid on the most proficient method to draw a one-point viewpoint, we’ll zero in on the structures that line the road. This perspective can be somewhat trickier to draw than you naturally suspect, so you should attempt to follow the reference picture intently here. You can begin by defining a short even boundary at the stopping point where it vanishes. Then, we will draw a few square and rectangular shapes for the structures’ sides and windows. To oblige viewpoint, they will be at a steady point with the point of the walkways.
Stage 4:
We will add one more part of the structures in this fourth piece of your one-point viewpoint drawing. Since it is much nearer to the watcher, this part will be much bigger than the first. Whenever that is finished, we’ll complete the last pieces and subtleties in the subsequent stage of the aide.
Stage 5:
You are presently prepared to finish the organization in this step of our aid on the most proficient method to draw one point viewpoint. In this one, we will attract one more segment of structures whose size and shape will be indistinguishable from the past one you have recently drawn. For some assortment, the main detail we’ll draw for this segment will be an all-in-one resource. When you have drawn this part of the structures, you can add any extra subtleties you could like! These can incorporate signs above entryways or sky subtleties like mists or the sun. Assuming you add additional subtleties, attempt to keep them at the right points to the remainder of the picture you’ve been dealing with. Reward: Utilize these tips to make this drawing more straightforward. Bringing a point of view of any sort into a 2D picture is surely a precarious errand, in any event, for prepared artisans. That is because you’re depicting aspects that don’t exist, and it is not difficult to fail to understand the situation.
Stage 6:
Incredible work on this one-point viewpoint drawing, and presently you can unwind with some shading fun! With your picture, you have numerous choices to variety it. You can utilize all your #1 varieties to polish it off, and it will work perfectly! We’ve just shown you one of the ways of shading your image in our example picture, yet this is your opportunity to allow your imagination to roam free as you complete it.
also read:The Impact of Technology on Omnichannel Customer Experience